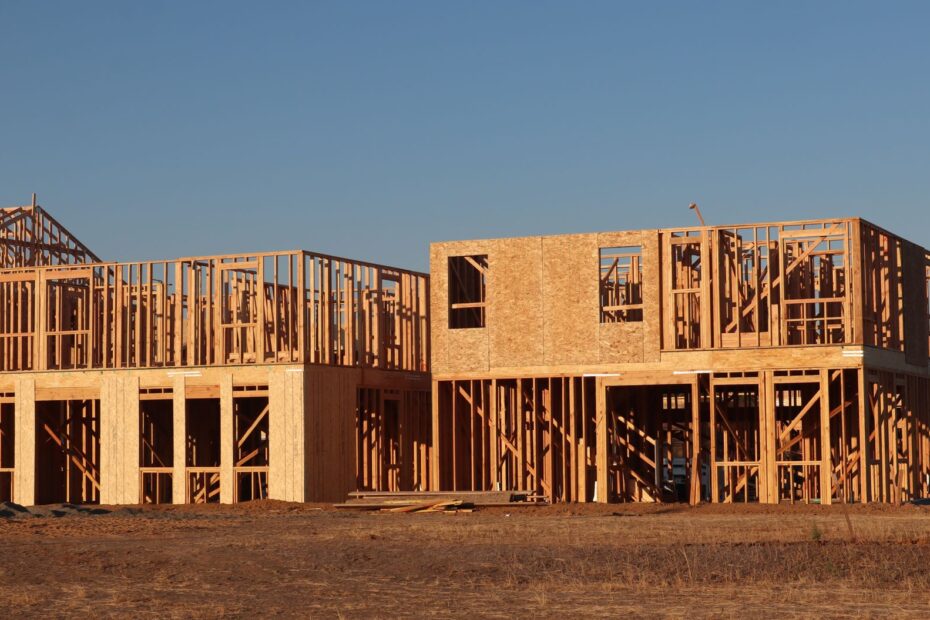
A network of studs, joists, and rafters gives a home its shape and carries roof, floor, wall, and occupancy loads down to the foundation. Before drywall covers the lumber, your studs, joists, headers, rafters, and connectors form a continuous load path from the roof to the soil.
This explanation follows the structure from concrete footing to roof sheathing for homeowners planning a build, reviewing a remodel, or discussing details with a framing contractor.
The Structural System Transfers Loads to the Ground
Finished rooms conceal hundreds of connections behind drywall, insulation, siding, and trim. Rough framing includes the floor system, wall sections, rough openings, roof members, and sheathing installed before those finish materials cover the structure.
Your house stays stable because gravity loads follow a planned route. Roofing, snow, furniture, occupants, and framing weight move downward through roof members, load-bearing walls, beams, foundation walls, footings, and soil.
The Load Path Carries Weight Downward
Roof weight lands on exterior walls or interior bearing lines shown on your framing plan. Floor joists and beams spread loads across bearing points instead of leaving weight suspended across open space.
A missing connection can interrupt that route and leave a weak point. Your contractor must account for concentrated loads, such as a roof valley above a window, because the header and wall studs below receive more force than nearby members.
| Framing part | Location | Role in your house |
|---|---|---|
| Foundation sill plate | Along the top of your foundation | Connects wood walls to concrete through anchor bolts or listed connectors. |
| Floor joists | Between bearing points beneath your floor | Carry floor loads across beams, girders, or bearing walls. |
| Wall studs | Inside wall assemblies | Transfer vertical loads and form cavities for insulation. |
| Headers | Above doors and windows | Route loads around rough openings and into side studs. |
| Sheathing | Across wall and roof surfaces | Stiffens the structure against wind-driven racking force. |
| Roof rafters or trusses | At the roof structure | Carry roof loads toward exterior walls or interior bearing lines. |
That route explains why wall sections are not interchangeable partitions. Your framing must stay plumb, tied together, and resistant to sideways movement before finishes conceal details that are difficult to inspect later.
Platform Framing Forms the Standard Modern Pattern
Each completed floor deck becomes the work surface for the story above it. Platform framing places walls on a framed floor, then places the next framed floor on those walls.
You will find this method in most new wood-framed homes in the United States. Story-height studs are easier to handle, floor lines interrupt wall cavities, and crews work from a stable deck rather than tall continuous studs.
Platform and Balloon Systems Use Different Wall Runs
| Feature | Platform framing | Balloon framing |
|---|---|---|
| Wall stud length | Studs run one story at a time. | Studs run continuously from the foundation to an upper level. |
| Floor location | The floor rests on the wall below. | The floor attaches to tall wall studs. |
| Fire blocking | The floor line interrupts wall cavities. | Long vertical cavities need careful fire blocking. |
| Modern use | Used for most new homes. | Found mainly in older homes. |
Balloon framing uses full-height studs that continue past an intermediate floor. Because a tall wall cavity can act like a chimney during a fire, your renovation needs careful fire blocking at each floor level.
Engineered lumber does not alter the platform sequence. Your structure can include laminated veneer lumber, I-joists, metal hangers, and prefabricated roof trusses while retaining the same floor-by-floor arrangement.
Engineered Members Create Concentrated Loads
A 16-foot open room can need an LVL beam instead of a solid-sawn member. Each beam end can place a heavy point load below, so posts, hardware, and footings must carry that force down to the soil.
Steel connectors keep the load path continuous at critical joints. You may see Simpson Strong-Tie hangers, straps, post bases, and hold-downs selected for stated loads, named fasteners, and exact placement details.
Never swap a specified hanger, strap, nail pattern, or engineered member for a similar-looking part. Your connection depends on the listed installation requirements and fastening pattern.
Foundation and Floor Work Establish the Base
Concrete starts the wood structure, but it does not end structural decisions. Foundation walls, piers, or slab edges must be level enough for the foundation sill plate to sit flat without unsupported gaps.
Your crew places a moisture break where local rules or site conditions call for one, then fastens treated sill plates to concrete with anchor bolts or listed connectors. Those anchors resist sliding and uplift during wind events.
The First Floor Follows a Set Order
- Set sill plates. Treated lumber sits over the foundation and receives wall or floor framing.
- Place girders. Beams span between posts, piers, or bearing points beneath the floor.
- Install joists. Floor joists span across bearing walls, beams, or girders at the planned layout.
- Close the rim. Rim boards cap joist ends and hold the floor perimeter in line.
- Fasten subfloor panels. Structural panels tie the floor assembly together and form the working deck.
Floor joists run in one planned direction, usually across the shorter span between bearing points. A beam below shortens the span, which can reduce floor bounce and allow a shallower joist depth under the stated design conditions.
Structural subfloor panels do more than hold furniture. Glued and fastened panels tie parallel joists into a diaphragm, reduce squeaks, and give your crew a level deck for wall layout.
Moisture Control Starts Before Wall Work
Rain on fresh lumber does not automatically mean structural damage. Standing water and repeated soaking can stain panels, swell panel edges, and delay finish work inside your home.
Inspect the deck before wall sections go up. A bowed rim board, loose panel edge, or misplaced stair opening becomes much harder for you to correct after walls and roof members carry weight above it.
Walls Form the Vertical Load-Bearing Frame
Chalk lines on the subfloor mark the exact location of each wall. Your crew lays out plates, marks stud positions, frames rough openings, and raises completed wall sections onto the deck.
An exterior wall includes bottom plates at the floor, wall studs at regular spacing, and top plates along the upper edge. A second top plate laps wall intersections and ties separate wall sections into one continuous line.
Headers Route Loads Around Openings
| Wall part | Position | Structural role |
|---|---|---|
| Bottom plate | At the floor | Locates and fastens the wall section to the deck. |
| King stud | Full height beside an opening | Stabilizes the opening and holds header framing. |
| Jack stud | Below each header end | Transfers header load down to the bottom plate. |
| Header beam | Above a door or window | Spans the opening and routes load to side studs. |
| Cripple stud | Above or below an opening | Maintains the stud layout in short wall sections. |
A header over your 3-foot window does different work than one over a 10-foot patio door below a second-story bearing wall. Header size depends on span, snow load, roof geometry, floor area above, lumber species, and engineered design details.
You should not assume an interior wall is nonbearing because it divides rooms. Your plans, framing direction, point loads, and engineering identify whether that wall only separates spaces or carries force from above.
Wall Layout Coordinates Trade Work
Stud spacing affects more than strength. A 16-inch or 24-inch on-center layout can line up sheathing edges, insulation widths, drywall fastening, cabinet backing, and plumbing routes where the structural design permits that layout.
Blocking between studs can stiffen a wall, hold drywall edges, or serve a fire-control role. Your framing crew leaves planned routes for pipes and ducts, but deep notches and large holes face code limits and structural review.
Do not cut a stud, plate, beam, or header for a late utility route. Your plumber or electrician can reroute the work, while a weakened bearing member can affect the structure above it.
Sheathing and Roof Members Close the Structural Shell
Standing walls can rack out of square until structural panels tie them together. Sheathing nailed in the stated pattern turns wall segments into braced-wall or shear-wall assemblies that resist wind force.
Your crew installs wood structural panels with edges backed by framing where the plan calls for backing. Panel orientation, movement gaps, edge nailing, and hold-down locations affect lateral resistance at your home.
Wall Panels Resist Sideways Force
A garage wall with a wide door opening has less solid wall length than a bedroom wall. That shorter segment can need narrow engineered shear panels, portal details, steel hardware, or a revised layout so wind force reaches the foundation.
APA, The Engineered Wood Association, publishes panel and fastening information for designers and installers. Your local building codes still control because seismic risk, wind speed, and exposure differ sharply between counties and project sites.
Rafters and Trusses Use Different Roof Load Routes
| Roof system | Load route | Effect on attic space |
|---|---|---|
| Rafters with ridge board | Rafters bear at exterior walls and pair at the ridge. | Can leave room for a cathedral ceiling or usable attic. |
| Rafters with ridge beam | A beam carries ridge load to posts and bearing points below. | Allows open ceilings but needs a planned post line. |
| Engineered trusses | Triangulated webs route loads to bearing points. | Forms repeated units but limits later alterations. |
Roof trusses arrive with a layout drawing that identifies each position, bearing point, bracing detail, and repair rule. You cannot cut a truss web for attic storage, a skylight, or a duct without direction from the truss designer.
Roof rafters need a separate support logic. A ridge board aligns opposing rafters but does not carry vertical load, while a structural ridge beam carries load and needs posts that continue down to suitable bearing points.
Roof decking goes on after the roof frame is straight and braced. Underlayment and roofing should follow soon afterward because a dry shell protects your subfloor, wall panels, and interior framing from repeated exposure.
That weather-ready shell depends on design limits established before lumber is cut.
Spans, Materials, and Building Codes Set the Details
Two homes with the same square footage can need very different member sizes. A 2×10 floor joist can span farther or less far based on species, grade, spacing, live load, dead load, and whether that floor carries a tiled bathroom or bedrooms.
Your plans should state the layout rather than leaving a job-site guess. Studs, joists, rafters, and roof trusses line up so sheathing edges land on framing, loads stack over bearing points, and finish materials have backing.
Prescriptive Tables Have Clear Limits
The International Residential Code includes prescriptive tables for conventional wood-frame conditions. Those tables do not cover every cantilever, tall wall, large opening, unusual roof form, high-wind location, or multistory point load.
American Wood Council span resources show why lumber species and grade stamps matter. No. 2 Southern Pine, Douglas Fir-Larch, and Spruce-Pine-Fir do not share identical allowable spans at the same depth and spacing.
Field Details Need Careful Inspection
- Check layout marks. Confirm that joist and stud locations match the plan before panels conceal the lines.
- Inspect fasteners. Use the stated nail length, screw type, and spacing for each connector or panel.
- Track hold-down hardware. Inspect bolts, washers, rods, and straps before concrete or finishes hide them.
- Protect cut ends. Seal treated-lumber cuts and keep wood away from persistent ground moisture.
- Keep project records. Save truss drawings, beam sheets, inspection records, and engineering letters with house files.
You should expect inspection points after footing work, foundation work, rough framing, and related trade rough-ins, though local schedules differ. Inspectors review adopted building codes, while engineers handle design conditions outside prescriptive limits.
Occupational Safety and Health Administration rules affect the worksite as well. Fall protection, scaffold access, power-tool practices, and material handling matter because framing combines elevated work, heavy loads, and fast-moving crews.
Those requirements shape budgets and prevent expensive corrections once construction is underway.
Cost and Mistakes Need Plan-Based Review
A 2,000-square-foot home can have a plain gable roof or intersecting rooflines, tall ceilings, large openings, and a three-car garage. Those choices change labor hours, lumber quantities, engineered members, and hardware counts before a crew raises the first wall.
Your framing estimate should separate labor, dimensional lumber, engineered lumber, sheathing, connectors, trusses, equipment, and waste handling. Compare itemized local bids against the same plan set instead of relying on a national figure that ignores site access, market conditions, and design revisions.
Schedules Depend on Site Conditions
A compact single-story home on a clear site can move from floor deck to roof sheathing in days where crew work is coordinated and materials are staged. More complex homes can pause after rain, failed inspections, missing trusses, revised beam details, or delayed crane access.
Changes after walls stand cost more than changes on paper. Your choice to relocate a stair, widen a window, or remove a post can affect headers, joists, shear walls, roof bearing lines, and foundation work below.
Structural Errors Need More Than Cosmetic Work
- Altered bearing members. Removing a post or wall can leave upper loads without a continuous route to the footing.
- Improvised headers. Stacked scraps rarely match the required span, bearing length, or connection detail.
- Missing connectors. Omitted straps and hangers weaken uplift and lateral-load connections at predictable weak points.
- Poor sheathing fastening. Wide nail spacing or missed framing can reduce a shear wall’s stated resistance.
- Unprotected lumber. Ground contact, trapped water, and long exposure can damage materials before enclosure.
- Altered trusses. A cut chord or web can change force patterns across the roof unit.
House framing is high-risk work for an inexperienced DIYer because errors can stay hidden behind finishes for years. You can identify components and ask better questions, but structural changes belong with a licensed designer, engineer, or qualified framing contractor.
Ask for the plan detail behind each major field change. A verbal promise cannot document header sizing, load transfer, connector selection, or footing capacity.
Final Thoughts on the Framing Sequence
Your home stands because each member passes force to the next: roof to wall, wall to floor, floor to foundation, and foundation to soil. Study that load path before judging a visible detail, and you will see why straight walls, correct hardware, dry materials, and plan-based changes matter long after paint covers the lumber.
FAQ
How does house framing work from the foundation to the roof?
Roof, floor, and wall loads follow a continuous path to the foundation. Your foundation sill plate connects wood framing to concrete, floor joists carry floor loads to beams or bearing walls, wall studs carry vertical loads, headers route loads around openings, and rafters or roof trusses carry roof loads to bearing points below.
How is a house typically framed?
Most new U.S. homes use platform framing. Your crew anchors sill plates to the foundation, frames a floor deck, raises walls, adds upper floors where needed, sets rafters or roof trusses, and then fastens sheathing to stiffen and enclose the structural shell.
What are the steps to frame a house from the foundation to the roof?
The framing sequence starts with the foundation, sill plates, beams, joists, rim boards, and subfloor. Your crew then frames walls and rough openings, installs upper-floor members where needed, sets roof framing, fastens roof decking, and dries in the shell with roofing materials.
What are the main types of framing in construction?
Platform framing is the standard wood method for new houses, while balloon framing appears mainly in older homes with continuous tall studs. Your project can also include post-and-beam work, light-gauge steel, concrete, or masonry, based on the design and local conditions.
What is the difference between platform framing and balloon framing?
Most modern homes place each story on a framed floor deck, whereas balloon-framed walls use tall studs that extend past an intermediate floor. Your older home can contain balloon framing, which needs careful fire blocking because its wall cavities can form long vertical openings.
How much does it cost to frame a 2,000-square-foot house?
Regional labor rates, roof complexity, story count, engineered lumber, site access, and material prices can make a 2,000-square-foot home’s frame vary widely in cost. Your most useful comparison is a set of itemized local bids based on the same drawings, specifications, and structural details.